Mechanical engineering drawings are the most common basis of understanding and cooperation for all those involved in industrial manufacturing (designers, engineers, quality control technicians, etc.).
However, there are often different opinions and even disputes regarding the understanding and interpretation of several critical specifications of an engineering drawing.
 Our seminars are truly needed for a company’s staff if one of the following applies:
- Inability to understand the meaning and implications of geometrical specifications on drawings
- Existence of different opinions regarding the interpretation of tolerances in engineering drawings
- High rate of incorrect answers to the GD&T “skill test” that follows
Our goal is a common understanding and seamless collaboration between a company’s departments, in matters of engineering drawings. We achieve this goal through the extensive use of real-world examples while participants are interactively guided to the correct interpretation, the avoidance of mistakes, and finally the effective use of mechanical engineering drawings.
Take the following test to see how well you can really read a mechanical drawing.
Find the right answers at the bottom of the page!. Wishing you success!!!
Question 1 of 4
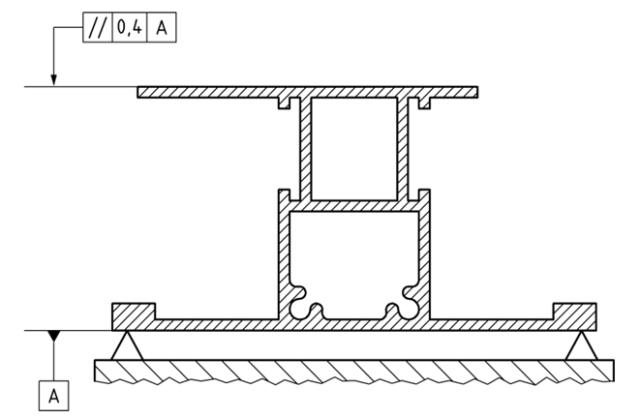
Does this geometrical tolerance control the form, the orientation or the location properties of the top surface?

Possible answers
1. Form only
2. Orientation and Form
3. All three of them
4. None of them
Question 2 of 4
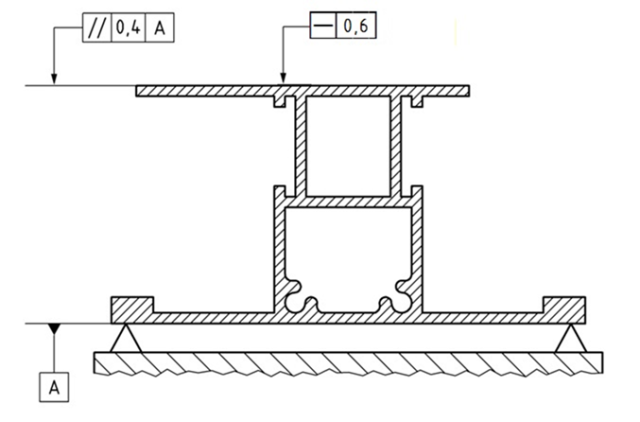
Select the correct answer for the straightness tolerance requirement on the top surface (0,6 mm):

Possible answers
1. It is OK as is
2. It must be less than 0,4mm
3. Datum “A” is also needed
4. It must be 0,4mm
Question 3 of 4
The “28±0,25mm” distance is measured with a caliper in the extruded profile in two different places, as indicated below. Select the correct answer:

Possible answers
1. The red measurement is correct (28,31mm)
2. The green measurement is correct (28,19mm)
3. None of the measurements is correct
4. Both measurements are correct
Question 4 of 4
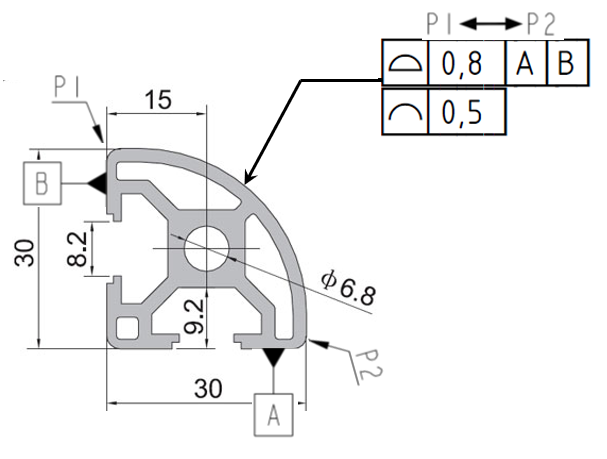
Are the following two geometrical tolerance specifications correctly defined?

Possible answers
1. No, line profile tolerance must be more than 0,8mm
2. They are OK, but TEDs¹ are missing
3. No, these two tolerances cannot be specified together
4. They are OK as is
¹TEDs are the Theoretically Exact Dimensions
GD&T SKILLS TEST – ANSWERS
Question 1: The correct answer is 2. Orientation and Form
Question 2: The correct answer is 2. It must be less than 0,4mm
Question 3: The correct answer is 4. Both measurements are correct (Geometrical tolerance specification is needed!)
Question 4: The correct answer is 2. They are OK, but TEDs are missing
